In this comprehensive guide “How to Migrate Automation Anywhere MetaBot to Automation 360” will guide you from all the essential aspects of migrating Automation Anywhere Metabot into automation anywhere 360. Providing valuable insights and actionable steps to ensure a successful and seamless transition. From planning and preparation to the execution and optimization stages, let’s explore everything you need to know about migrating Automation Anywhere MetaBots to Automation 360.
You can also visit our official YouTube Channel EasyWay2Learn to see our training videos. Based on RPA Realtime Projects for Automation Anywhere, UiPath, and IQ Bot.
Automation Anywhere Interview Questions: How MetaBots are migrated
Steps for Migrating Automation Anywhere MetaBot Code into Automation 360
In Order to migrate Automation Anywhere MetaBot Code into Automation 360. You need to follow the below steps:
(a) You must have Automation Anywhere atmx file and MetaBot mbot files.
(b) Remove extra or unused lines of code, Assets or Logics which is not required before migration.
(c) Test your code in Version 11 and fix bugs if any present before migrating to Automation 360.
(d) Use BOT Scanner tool to see the % of code changes required once migration is completed.
Go to Automation 360 and look for Package called “Bot Migration”. Select “Migrate Legacy Bot” from the available list.
Select your task BOT or MetaBot which you are going to migrate. You will get 3 options to choose your atmx and mbot files.
1. Control Room File :
Select atmx or mbot files if it is available in Control Room (e.g. D:\taskbot.atmx or D:\metabot.mbot)
2. Desktop File :
Select atmx or mbot files if it is available in ShareDrive or in your local drive (e.g. D:\taskbot.atmx or D:\metabot.mbot)
3. Variable :
Under this you can pass the path and extension of your file, which you are going to migrate. (e.g. D:\taskbot.atmx or D:\metabot.mbot)
Output Folder Path: Here you can give the output location where xml file will create once migration completed successfully for taskbot or metabot.
Migration time out in mins: Here in this box, you can give timeout in minutes which will stop the migration process after given timelines.
Migration process will take some time based on number of lines or assets or logics available in Task Bot or MetaBot.

Once Automation 360 Bot run completed successfully, it will create of copy of Task Bot with same file name available with atmx. Also, it will create separate folder for MetaBot file where all the logics will be there.
If you want to try yourself and see how the Automation Anywhere Migration process works, then you can download sample Automation Anywhere version 11 code which includes MetaBot.
Click Here to Download atmx file.
What are the code changes needs to be done after migration to Automation 360?
Once code Migration completed successfully in Automation 360 it will looks like as attached image.
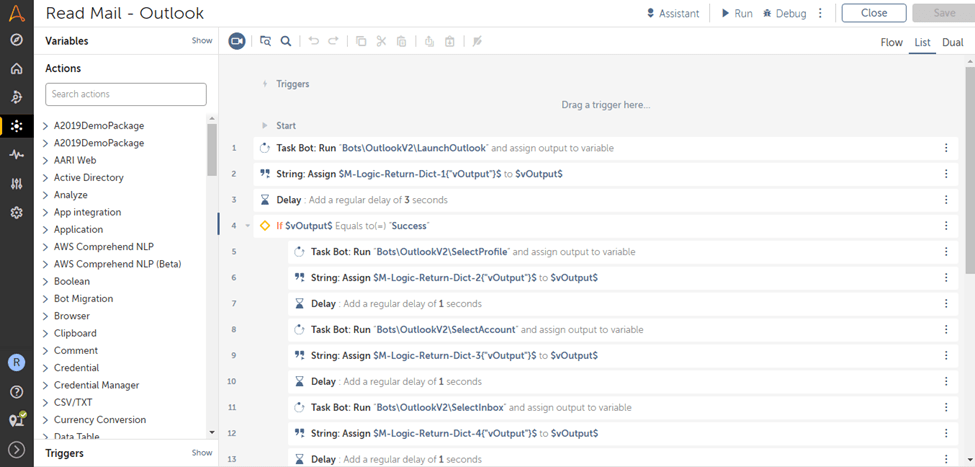
You need to re-map the MetaBot logic and make the necessary changes in the code base on error details like map variables, check loop and other commands where you have got error after migration to Automation 360.

You need to execute the BOT to identify if any error found after code migration. If is there any error you need to analyze and fix the issue first.
Hope this article is helpful and able to understand how to migrate Automation Anywhere MetaBot to Automation 360. Here we have tried covered information from the point of RPA Automation Anywhere Interview Questions. You can also visit our other Blog Post based on other trending Technologies.